David Bickley's Wargames Blog

The occasional ramblings of an average gamer, journeyman painter, indifferent modeller, games designer, sometime writer for Wargames Illustrated and host of games in GHQ.


Wednesday 29 January 2020

No Plan Survives Contact With The Enemy...

...but nevertheless Phil and I have been working on a plan for our games in GHQ this year. It's a two pronged plan we have arrived at after much deliberation. In the first part of the year we plan a series of battles set in North America from the AWI via the War of 1812-15 to the ACW, all linked by being fought over substantially the same terrain layout. We shall use Black Powder as the rules driver, including scenario based specifics for the armies deployed and our usual in-house rules here in GHQ,  in the handling of routs for example.
In the second half of the year we are hoping to play out an ACW campaign inspired partly by following one on the web and partly by revisiting Sam Mustafa's ideas on campaigns in his Longstreet rules. As we will be using Black Powder for the games then a certain amount of 'development' is called for based on his use of Character,Campaign and Terrain cards in the system so we shall see where that takes us. I also hope to incorporate my own Random Event cards which I developed for use in Bull Run to Gettysburg. We shall , once again, have to wait and see where that takes us. In the meantime, here are some pictures from earlier games in all three periods to whet your appetite ~


The last two pictures are my 28mm alter egos, the head was sculpted by my son Matt for a Christmas gift one year and cast by Trevor at Dixon Miniatures. A vanity project if ever there was one, but who amongst us doesn’t yearn to be down amongst the little men leading them to glory? The horses by the way are by Dixon Miniatures and the figures’ bodies are from Redoubt Enterprises. The Reb, ole Jubal E Bykleigh, captures my look in the 1980’s and the Union figure, Useless S Bykleigh, a more contemporary, and sadly stouter, look!


Monday 27 January 2020

Until Night Falls

The most recent meeting here in GHQ saw a Black Powder Wars olf the French Revolution game played out between Phil, commanding the Austrians, and your truly, fired up with revolutionary zeal, commanding the gallant lads of the Republic! It's nothing complicated as a scenario, two small Divisions of infantry and cavalry with some horse artillery support running into each other and seeking an advantage before night falls, decided by a random dice throw starting after eight of the expected twelve turns. On with the action then ~
With a skirmish screen thrown out to its front and its flank supported by heavy cavalry the Austrian infantry advances steadily towards the French.
On the Austrian left the Brigade of Light Cavalry surges forward to seek out the French
Sadly deficient in Revolutionary zeal, the first French Demi Brigade moves onto the field of battle. House rules mean that the columns on each flank cannot fire and that the whole Brigade suffers cohesion issues if a part becomes Disordered or Shaken, but it can also Charge on a Brigade order, though not on a Follow Me command.
The French Heavy Cavalry and accompanying horse artillery battery protecting the infantry’s right flank shows little enthusiasm for the fight to come. Loss of the officer class gives the cavalry a Command roll of only 7, a bit of a handicap in early moves!
Then, in the following turn, the horse artillery Blunders and advances recklessly to its left face! Merde! There are a lot of Austrians there!
The French Chasseurs a Cheval impetuously charge the Austrian dragoons. Surely this can only end in tears and bloodshed? Mais non, mes  amis! Showing far more martial spirit than the enemy, they rout the dragoons in a second round of combat, despite being Shaken in the first round.
They go on to beat the Austrian cuirassiers in the subsequent melee, before retiring behind their infantry to rally. Our house rules on routing units gives two chances to rally, subject to not having first left the table, and the Austrian cuirassiers take full advantage of this. Merde!
Still not much revolutionary zeal on display for the French. The horse artillery, despite flaying the approaching Austrian Infantry with canister shot, suffer heavy losses from the infantry’s repeated volleys. Too many excess casualties result!
With great bravery the gunners have stood to their guns under ever increasing fire, but flesh and blood - not to mention pewter - can only stand so much. The Austrian gunners, while full of admiration for their French counterparts, waste no time in thinning the ranks of the reluctant French Heavy Cavalry to their front.
With no time to spare the French horse artillery flee, leaving their guns to the enemy. They pass the Disordered and reluctant French dragoons as they flee!
Finally the French light infantry supporting the Demi Brigade make to the flank just in time as the Austrian grenadiers make ready for the assault. French firepower will deter them for the time being at least.
We were both a little relieved when 'night fell' at the end of Turn 8 as almost all our cavalry was retiring and the infantry were fairly unenthused by the fight. All through the game the Austrian command dice seemed sluggish while the French were notably lacking in Revolutionary Zeal. I think it was just one of those games where a draw was destined right from the fairly ineffective first Turn! But despite everything it was a grand game we both agreed with many moments of drama and humour in equal measure. Not a bad way to spend a few hours with a good friend.

Friday 24 January 2020

More Hessians for my AWI games

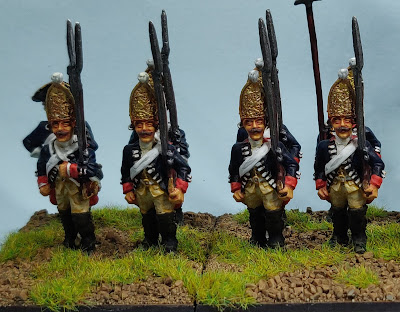
Despite the best efforts of hand and eye to thwart my painting intentions I have been steadily working my way through a new Hessian unit for our AWI games here in GHQ. The figures are the venerable Front Rank ranges, a mixture of codes from their AWI Hessians and SYW Prussians. No doubt that would trouble some, but not me. The flags are from Flags of War and the bases as usual from Warbases ~


They are meant to represent the Grenadier Regiment von Rall, although both the figure coat design and the painting are compromises on my part. They will also be doubling up along with their fellow AWI Hessians in future SYW games as I need more figures to fight my bloated French army. I also added a single mounted officer to act as an ADC in Black Powder games ~

I used a couple of prints by Don Troiani as the inspiration for these and thought you might enjoy seeing them ~
A depiction of the Regiment in action at the Battle of Trenton which I found while browsing for examples as sources for painting the figures. Not a print I own sadly, but one I would really like on the wall in GHQ.
The study of an individual Grenadier highlights both where the figure itself and my painting of them deviate from their probable contemporary appearance. I’ll leave you to work out the differences, if you are that way inclined that is. They will do for me!
Now that these are out of the way I’ve some Highland Infantry Grenadiers for our F&IW games. They are by Redoubt Enterprises, picked up last year from Colonel Bill’s. I hope to finish the figures off before the end of the month if possible.


Thursday 16 January 2020

Year of Destiny?

For the recent Monday game here in GHQ with Phil we had decided to give To the Strongest another run through, borrowing Phil's grid marked games mat and deploying my Saxons and Normans. {I should say that this is the figures' third rebasing, so you must excuse the lack of static grass, clumps and other vegetation for now, I've just not felt like tackling that as yet.} With the exception of one figure from Gripping Beast all of those you see are from Foundry, designed by my son Matt. You may have seen he has done a range of late Saxons for Footsore recently which look very compatible with these older ones. I may add some at some point, but that means more Normans! As Phil painted the Normans for me I would have to fit any more in his Commission schedule, no easy task as he is in demand!! As usual, a few captioned pictures to give a flavour for the game ~
The host of Harold the Hairless drawn up for battle. (The mat
really is much greener than it looks in the photos by the way}

Huscarls hold the centre supported by Harold's Thegns.

Harold and his Household are in the front line of battle.

William the Bastard's army drawn up for battle. Too many
archers for my liking I have to say!

Typical sneaky Norman attack on the Saxon right flank!

While the Saxons' own left flank is reluctant to move forward.

The Norman centre is advancing now against the Fyrd.

With the wood offering some protection the Saxons are trying
to flank the Norman attackers.

The two armies are beginning to close with one another.

Harold the Hairless is fighting with his Huscarls in the centre!

The Saxon right is holding up well but is being outflanked!
More elements are engaged in the centre now.

The Saxon lines have been breached and the Normans are in
the rear!

The fat lady is nearly ready to exercise her vocal cords!

Its all over for the Saxon cause, but Harold the Hairless lives to
fight another day!

I have no plans myself to move over from our Neil Thomas mash up for my Ancient and early Medieval games here in GHQ, but we both enjoyed our first run through of the rules at Phil's, so it did no harm to try the rules with different armies. Either way it has shown me that the Normans need at least four more bases of infantry and perhaps two bases of unarmoured cavalry. Sadly no room in the present schedule for 2020 for any of that. So its back to painting the von Rall Grenadiers for the AWI for me!

Saturday 11 January 2020

Standard Bearers, Medics, a General, and a Bishop

Next off the painting desk from my January Allsorts are seven more VBCW figures in the shape of three Standard Bearers,  two Medics, a General and a Bishop. The first six are from Footsore, the bishop though is from an unknown manufacturer, a part of Tim Hall's generous gift last year ~


Next to move to the head of the painting queue are some Front Rank AWI Hessians in the form of the Grenadier Regiment Von Rall. If I get through them in good time I've two mounted figures by the same manufacturer to make an overall command vignette base for my AWI Hessian force.

Star Fort to Vauban Fort

I'm trying not to buy any new figures in the first month's of this year as I'm hoping both to reduce the Lead Pimple and see how my hands and eyes issues pan out over the next few months. My thumb joints get pretty painful if I paint for long some mornings, so I was looking for a lighter project when figure painting might not be too easy. I saw an advert for the new AMERA Star Fort and, even though it's plastic, I ordered one just before Christmas. Communication from the company has been first rate and a large, but lightweight, parcel duly arrived on Monday. It's a big beast ~
 I hope to finish it not as an earthen Star Fort but as a stone Vauban style defence. To that end I ordered a heap of stone paper sheeting from Metcalfe, the Superquick railway modelling folk - I had many of their buildings back in the 70's when I started out in the hobby. Again their communication and service were first class and the package of sheetings arrived on Thursday. The fort kit comes in 8 parts: 4 corner bastions; 3 connecting wall sections; and 1 log gate (not in my photo). Extra wall sections and corner pieces are available separately if you want an even larger piece!
I've downloaded some free kits for features of a Vauban style gateway and plan to print these out in an appropriate size to fill the gateway space. It may mean I need an extra wall section for the rear, I'll have to wait and see. I'll post a progress report as I go along for anyone interested in seeing how it pans out.

Friday 10 January 2020

Raising the Siege of Palazzo San Philippe

On Wednesday evening Jon and I locked horns in GHQ for our first game of 2020, an Italian Wars game using the Pike & Shotte ruleset by Warlord Games. Jon commanded the army laying siege to the Palazzo while I commanded the heavily outnumbered defenders, and later the relief column of course. The throw of a Dx6 at the start of Turn 1 determined how many Turns before news of the relief forces arrival would reach both sides, 3 in our case. At the conclusion of Turn 3 a throw of a Dx3 determined how many Turns it took them to reach the vicinity, 1 in our game. At the start of Turn 5 a further throw of a Dx6 determined the entry point of the mounted and foot elements, in my case 1 & 6 meaning the horse entered on the extreme right of my base line, the foot on the extreme left! As ever the captioned pictures illustrate the ebb and flow of the game over its course ~
It seems that there are a large number of mercenaries in the pay
of the enemy! Lets hope they have not been paid lately.. 

The enemy's Gendarmes and Elmetti move out of camp towards
their goal.

On the enemy's right a party of foragers move forward.

The attack on the Palazzo gets underway despite the galling
fire from the defenders.

The enemy's heavy gun has the Palazzo's gates in its sights. A
Dx6 roll indicated it would take six hits to destroy the gates
and wall.

Meanwhile, back in the camp the evening meal is underway,
cooked by one Baldriccio...

Those Gendarmes don't seem all that keen to join the fight!
Meanwhile, the first of the relief force has appeared as the
defenders bravely hold on against the odds

Someone has blundered it seems! The Gendarmes make two
moves away from the enemy. A bit of relief for the Borgia
force as its own Gendarmes are hardly showing much
desire to enter the fray!

The fight for the Pallazzo is getting serious. The enemy have
breached the walls and bitter fighting rages inside.

An assault on the gates is made and though Shaken the enemy
are not repulsed. At this stage it looked as though Jon might
take the Palazzo and win the game.

More of the enemy storm the
walls!

Although suffering many
losses the enemy are finally
driven from their foothold!

At last the relief force begins to make its presence felt.

Rather worryingly though the enemy's Gendarmes finally turn
up en mass! The fight looks as if it might swing back in Jon's
favour at this point.

On the Borgia's left the foot elements of the relief force finally
make their presence felt, surprising the foraging party.

Arriving on a 'Follow Me!' order, relief force's Gendarmes and
Light Horse pin the remaining mercenaries as the others are
forced out of the Palazzo.

Before the Palazzo the fight is reaching its climax with the
enemy failing to break the relief force's foot elements. {Jon's
dice were just not up for it!}

Turn 9 sees the one Mercenary pike block  destroyed by a
charge in its rear from the Light Horse, while the other two are
about to be charged in the flanks.

Its all up for the enemy's cause! What a titanic tussle this had
been, swinging first to favour one side, then the other.
Ever the gentleman, Jon conceded the game at the conclusion of Turn 10, leaving the field to the battered but unbowed defenders of the Palazzo and the relieving force. No doubt there would be much rejoicing in the Borgia camp that night! For those interested in such things the figures, buildings and terrain scatter are all from my collection. The figures are mostly TAG, supplemented by Foundry, Perry Miniatures, Citadel, Games Workshop, Minifigs and Warlord Games. The MDF based buildings are from Warbases, Charlie Foxtrot and Foreground while the oven and small mill are from Irongate Scenics. Next game due in GHQ will be a Saxons v Normans game using Phil's 'To The Strongest' rules, chits and grided game mat.