David Bickley's Wargames Blog

The occasional ramblings of an average gamer, journeyman painter, indifferent modeller, games designer, sometime writer for Wargames Illustrated and host of games in GHQ.


Sunday 29 January 2023

Hanoverian Infantry regiment Hardenberg

Having completed the French part of my SYW expansion project and after due consideration I have made a start on the small Hanoverian contingent I planned to add to the collection. Just to recap at this juncture, the infantry, artillery and command will all be from Front Rank while the solitary cavalry regiment will be made up of Foundry SYW British figures gifted me by Jon last year. 

The first regiment I have completed, less the Grenadiers at this stage, are the Hardenberg Infantry regiment, 6A as they are coded for reference. I confess that I chose them, and their fellows yet to be painted, purely on interesting colour combinations in their uniforms. The flags are made from free downloads I sourced through internet searches, ever the cheapskate we wargamers! Anyway, no more gabbing on, see what you think ~

The Front Rank figures can truly be labelled 'veteran' I'd say but they have a charm of their own I find still. There are one or two issues with the officer and ensign figures being labelled British/Hanoverian in the list but lacking the  pompoms and oak leaves of the rank and file figures. I can live with that as in a game noone will noticed I'd say.

I mentioned the grenadiers' absence, largely due to my not yet having worked out an acceptable way of painting something approximating to the designs on the blank mitre front panels. I need to come up with a finish that is within my meagre talents yet will be acceptable on the tabletop battlefield. Don't hold your breath is all I can advise at this point...

Thursday 26 January 2023

The Bear From The Air!

 If you are a subscriber to the hobby's Number 1 monthly magazine, in either e-format or traditional print, then you may already have seen my small contribution on incorporating the latest Battlefront Team Yankee release, Red Dawn, into more general Cold War Gone Hot gaming. Sadly space demands meant that most of the photos of in-game action could not be used on this occasion, so I thought some of you might be interested in seeing more of what Phil and I made of the boxed set we were sent ~

The boxed set headlines the release schedule for the new expansion of Team Yankee in the form of the imagined Soviet invasion of the USA.
Utilizing the contents of the boxed set in our 1980's West German setting, the landing zone for the first wave. Most of the MDF houses seen here are from Lasercraftart.
The second wave arriving. This one made it into the magazine! The three farm buildings are from Warbases, the 15mm versions of their German Rural Buildings set.
This one showing the Airborne command groups made it in too! The slightly over scale tractor was in a children's toy set from back in the day and rescued from the back of a draw. 
Another view of the landing zone as the first wave troops disembark under fire. The factory buildings are from Sarissa Precision.
Leading elements of the Soviet Airborne force a crossing of the river under fire from the B.O.A.R. The river is The Last Valley's stream set.
A general view of the battlefield laid out for the photoshoot. The roads are from the Geek Villain modern roads mat.
It looks as if the landing has been at least an initial success for the Soviets! 
The wider release schedule for Red Dawn has some interesting items for 15mm modern players with armed civilians and technicals featuring amongst them. Soviets v Afghans anyone?

Monday 23 January 2023

Death Before Dishonour

 For our usual Tuesday game, this week on a Monday, Phil and I decided to get the Punic Wars collection on the table in GHQ and give Hail Caesar rules a run out in anticipation of receiving the updated Second Edition at some point. Phil took on the persona of Coronus Cunctator leading the army of the Republic leaving me to take command of the Carthaginian army as Hannibal Bicca. As is my wont, an annotated photomontage to convey some sense of the unfolding catastrophe...

The opening positions of the two armies: the Carthaginian army of Hannibal Bicca nearest the camera, the Republicans of Coronus Cunctator in the distance. For those interested, the villa is the Warbases small Roman villa kit.
Hannibal Bicca makes a sacrifice to the dice gods, in vain as things turned out, but let's not get ahead of ourselves at this stage.
The opening phase of the battle sees the Numidian light cavalry clash with the Roman and it's allied Celtic cavalry. Javelins fly to their targets but on the enemy come with steely determination.
On the left the Carthaginian army puts it's faith in their elephants supported by slingers and light infantry, with medium infantry positioned to mop up what remains of the enemy. At least that was the plan...
Most of the Numidian cavalry and supporting light infantry flee the field in disorder! Already the Carthaginian right is creaking dangerously.

The Carthaginian cavalry commander fails to lead his main force forward at this vital juncture in the battle, handing the initiative to his Roman opponent, despite the badly mauled remnants of the Numidian light cavalry seeing off the Celtic Medium cavalry in a fierce hand to hand combat.
The Allied Legion on the Roman right has moved into the attack only to be met by the Carthaginian elephants and their supports.  In the centre, Legio VI, the Wolf's Cubs, hold themselves ready to join battle with their foe.
On the Carthaginian right more Cavalry flee the field in rout, leaving only the Spanish Medium cavalry to hold off impending disaster.
Meanwhile, over on the Carthaginian left, the Allied Legion has got the best of the Carthaginian elephants' supports, leaving the great beasts vulnerable to attack.
Fighting is fierce with no quarter given or asked for. One of the great beasts falls in its death throes, one routs through its own supporting infantry, leaving only one to fight on alone!
The Carthaginian left is crumbling as the Allied Legion presses home it's advantage remorselessly. The omens are not looking good for Hannibal Bicca's cause...
The left and right wings of the Carthaginian army are in disorganised and panicked rout! Rather than face Dishonour Hannibal Bicca falls on his sword!
Hannibal Bicca's veteran African infantry and his Southern Italian mercenaries never got into action! With both wings of the army shattered and their commander crossing the Styx they would leave the field to fight another day.
It was all decided in five Turns! We were a bit rule rusty at the outset but soon found our second wind. The game played out pretty well we thought, giving a more cohesive feel to the battle than Neil Thomas's Ancient and Medieval Warfare rules seem to. We shall see what changes the new edition brings in due course.


Wednesday 18 January 2023

Gardes Suisses,2me Reg't

 Having seemingly broken free of the malaise which was holding my painting in limbo with the Roman civilians I posted in an earlier blog entry, my next project was to complete the final French infantry regiment for my SYW expansion project in the shape of the second regiment of the Gardes Suisses. As with the rest of my French army these are from the Foundry offshoot, Casting Rooms Miniatures, and are not to everyone's taste as I know. As usual, the bases are from Warbases and the flags from David's splendid blog resource 'Not by Appointment'.

For now at least this brings the French element of the SYW expansion project to a conclusion, though as wargamers we all know that it is fatal to utter the word 'finished' in respect of any project! This brings me nicely on to the next phase of the project, which is to either embark on my small Hanoverian contingent or to tackle the small imagination of Aufenhaltsland-Wolfsschinken. 

Finally, a little gentle nudge for those many anonymous visitors who look at each blog entry and move on without leaving any sort of response. It’s nice to be appreciated you know, so perhaps take a moment now and then to let me and others know you're not a bot?


Wednesday 11 January 2023

A Fierce Engagement at Rawnsley Gap

The friendliest of hostilities resumed in GHQ this week, with Phil tactfully choosing an ACW game to kick off the new year. The game is another of our series of loosely linked games, forming the 'Robinson in the Valley' campaign. An indifferent performance by both commanders so far sees neither worthy of promotion and so their basic command remains the Division of two or three Brigades'. The action sees Robinson's Rebs presented with an opportunity to defeat Bykleigh's Union force at Rawnsley Gap and so open the route into the valley for much needed reinforcements. If he succeeds the Rebs win and he is promoted, receiving a further Brigade in the next game. If Bykleigh can hold the gap then he is the winner, promotion and a possible Medal of Honor might be his fate. Defeat might see him sent out west...

The opening scene of the game. Robinson's difficulty is effectively deploying his troops into the narrow Gap, all the while being harassed from Union positions to his front. He has a Brigade deployed for a flanking attack on his left, but the going is difficult over broken ground and a wooded ridge making progress slow. Now, as is customary, the usual annotated photomontage to convey a sense of how the battle panned out ~

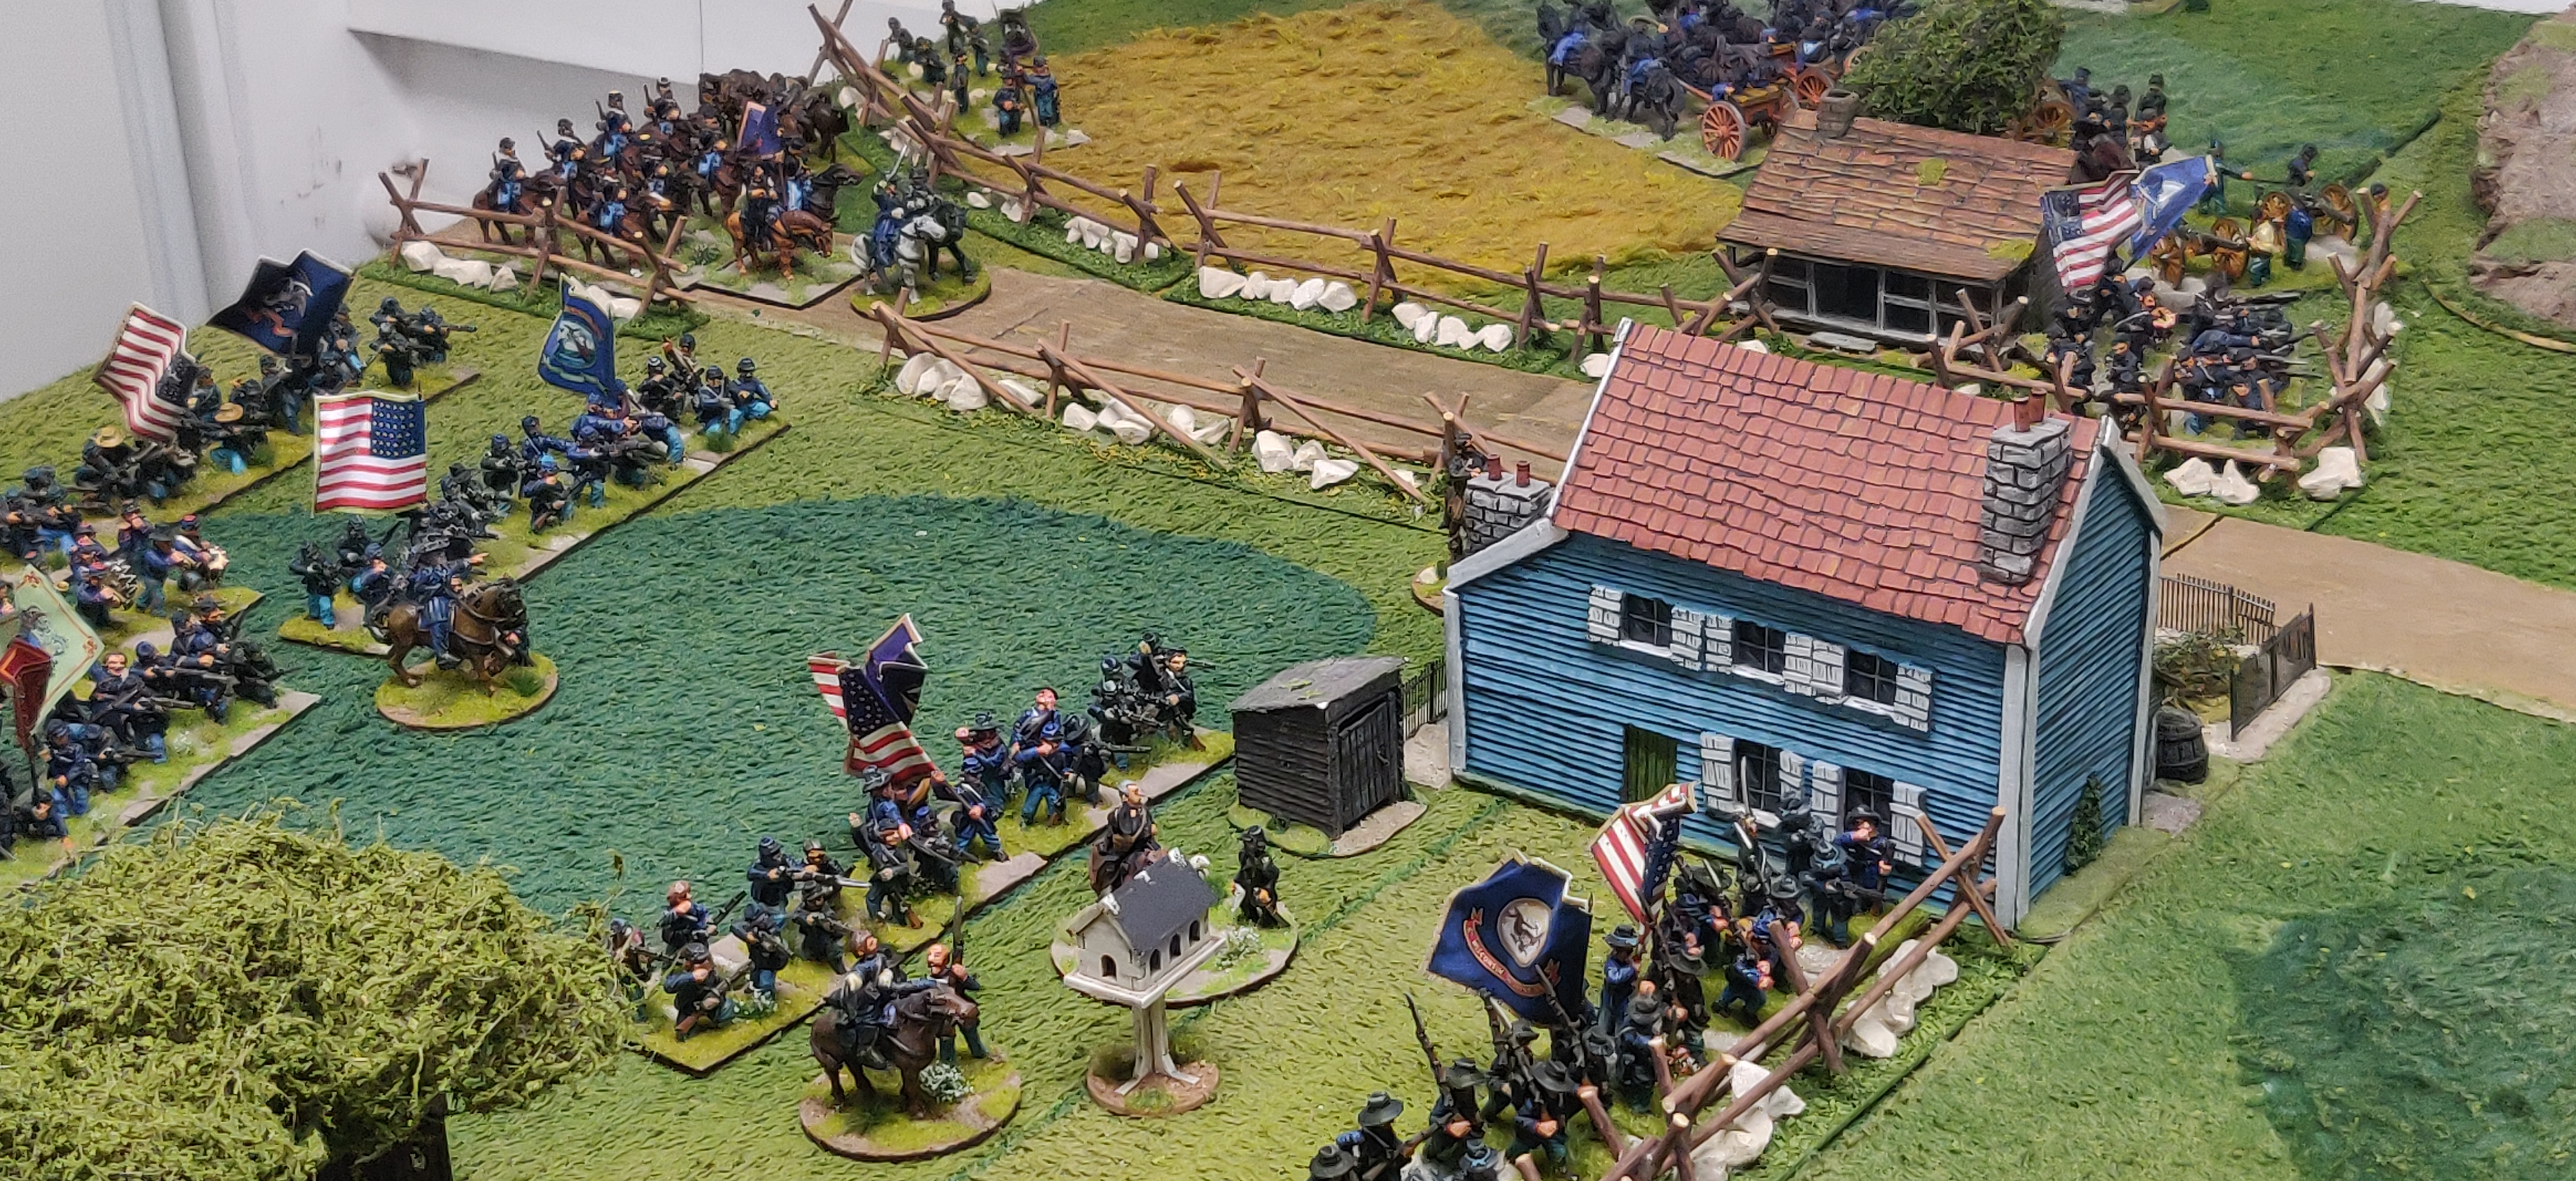
Calder's Brigade advances briskly past Lender's Farm, where the Staff are hard at it trying to work out where they will head after brushing 'those people' aside.
Paddock's Brigade are making heavy going of their advance. It seems there is some confusion when it comes to orders being received.
Brecher's Brigade takes the centre of the Union position around Aston's Farmstead with Moore's Brigade in support.
The 1st USSS are thrown forward in Open Order along a wooded ridge. They will hopefully slow down any advancing Rebs on the Union's right.
The Rebs' artillery opens the battle with a furious bombarding of both Brecher's and Desch's positions. Despite losses the boys stand firm. "They shall not pass!"
With Desch's command coming under heavy fire Bykleigh orders the Pennsylvanian cavalry forward with a view to occupying Aston's Farmstead and bringing some added fire on the advancing Rebs 
On the Rebs' right O'Brien's Brigade is making slow progress forward shadowed by the 1st USSS.
Calder's leading regiment shakes out into line as it prepares to move forward across the open fields towards the enemy 
Desch's command is coming under increasing pressure and some Disorder ensues. Support is now at hand though as the Pennsylvanians reach the farmstead.
Just in time they occupy the farm house and gardens as Calder's attack gets underway. If their left is turned Brecher's position will be difficult to defend and 'PJ' may seize the Gap!
Under growing pressure from O'Brien's Brigade the Sharpshooters are forced to fall back on their supporting infantry. There is real tension in the ranks as they hear the Rebs approaching through the woods!
A Fierce firefight breaks out as the Rebs close in on the Sharpshooters. The Rebel Yell rings out and under pressure the Sharpshooters fall back behind their supports. 
Calder's Brigade has come under increasingly effective fire causing much Disorder in the ranks and stalling progress on the Rebs' right 
Despite continuous artillery fire the Union boys are standing firm as the game nears it's halfway point.
Calder's Brigade is struggling to reform under steady Union fire. The Rebs'right is looking very shaky now.
At last Paddock's Brigade shakes out into line and begins to bring real pressure to bear on the Union centre and right. Moore's Brigade moves out to support the threatened flank.
In the centre the Rebs of Paddock's Brigade advance with determination but the western boys under Brecher stand firm.
On the Union's left Desch's command and the Pennsylvania cavalry have done their job, Calder's Brigade falls back Whipped!
On the Union's right and in the centre heavy firing is taking its toll on both sides! Once more the Rebel Yell rings out as they charge forward into contact.
Despite their advantage in numbers though the Rebs'first attack fails. The western boys sure fight hard!
A moment of disaster unfolds for the Union as in fierce fighting Brecher falls and his Brigade, without command, falters. O'Brien senses his moment has come to press home his attacks and beat back the troops on the Union right 
However, he has misjudged the boys in blue. Despite mounting losses they put up stiff resistance. Their steady fire sees O'Brien's Brigade fall back Whipped! Of all the times for the dice gods to desert Phil this was the cruelest, as victory turns to defeat...

As Turn 12 and thus the game concludes both armies are badly mauled. As the scenario did not allow for a draw the win goes to the Union who have held the Gap, just...

Order of Battle :-

Union ~ Brig Gen'l 'Useless' S Bykleigh

1st Brigade - Col Brecher

6 Wi

7 Wi 

10 Mi 

19 Ind 

2nd Brigade - Col Moore 

20 Mass 

76 NY 

94 NY

23 Pa Vol, Burney's Zouavres 

1st USSS 

3rd Brigade - Col Desch 

8 NJ Vols 

Battery L NY Light Artillery


Rebels ~ Brig Gen'l 'PJ' Robinson 

HQ 

1 Va Cavalry 

Sussex Light Dragoons

1st Brigade - Calder 

3rd Lo 

3rd Ark 

18 Ga 

Crump's Battery 9lb Napoleons 

2nd Brigade - Paddock 

2 NC 

10 NC 

16 NC 

28 NC 

36 NC 

Anderson's Battery 3" Rifles 

3rd Brigade - O'Brien 

1 Ma 

14 Va 

33 Va 

Another really close and taxing game which might in the final two turns have gone either way, but for the dice... A few bonus pictures to finish as a reward for my loyal reader making it through to the end ~