David Bickley's Wargames Blog

The occasional ramblings of an average gamer, journeyman painter, indifferent modeller, games designer, sometime writer for Wargames Illustrated and host of games in GHQ.


Thursday 29 February 2024

Ashtonski Battery

Wanting to add something to my Crimean War project for the Roosians , but unable to face the prospect of thirtyish figures to unit completion, I opted to paint two Warlord Games 12lb Roosian guns and crew next. As I mentioned previously they were part of the large package gifted me at the outset of the project by friend Colin Ashton, after whom the battery has been named. As I had ordered two Orthodox priests from TAG I utilized the second one by adding Father Rasputin to the gun's base in the act of blessing their efforts in the coming battle. Not much more I can say about them other than the gunners' cap bands really are now beyond the limitations of my hand and eye but I did my best ~

The next unit to have it's time under the brush is the 2nd Battalion, the 1st, the Royal Scots, to add to my truncated Highland Division. These are all Great War Miniatures figures, which I almost feel I could paint in my sleep now! {That arch bounder 'Black Bottle Bill' would probably tell you I do!} After that it should be the third Roosian Jaeger battalion; oh joy, oh rapture!

Surprise Attack along the Valley Turnpike

Having opened the second year of the linked games/campaign in The Valley with an indecisive drawn encounter - see an earlier blog post - Phil and I decided on a follow up game this week. The Rebs, ably lead by 'PJ hiself' and despite being weakened by the loss of the Louisiana brigade, would mount a surprise attack on the Union force in its camp. Thus Phil had of the initiative in the first of twelve planned turns, needing to move rapidly and defeat the Union before reinforcements rushing from Washington could arrive from Turn 7. As usual now an annotated photomontage to carry the reader into the unfolding action ~
An important visitor from Washington poses for a photo opportunity with Mr Brady as Useless S Bykleigh seeks to rouse the camp from it's torpor.
Meanwhile it seems the men will not have their early morning coffee rushed despite the urging of their officers!
The Rebs though are on the move! The South Carolinians break camp and shake out into their attack formation aiming to sweep up and around the Union's right flank. Meanwhile the Tar Heels press forward down the Valley Turnpike.
Speed is of the essence for the boys of "Robinsons Foot Cavalry" as they step off briskly down the Turnpike. I hope they paid the Toll though!
On his right Robinson cannot get the boys from Georgia to move with great urgency. They need to pin the Union left for the plan to unfold as envisaged.
The battle opens when the US Sharpshooters surprise the advancing Rebs with a sharp volley. The Rebs are halted and then thrown back in Disorder as the 79th New York add to the weight of lead thumping home!
The leading Rebs have retired on their camp, sowing confusion on the South Carolina brigade struggling to get forward.
Given a reprieve by the unexpected repulse of the initial assault ol' US Bykleigh is able to consolidate his defensive line on the left and throw out troops on his right to block the Rebs' left hook.
Hampered by tardy movement the South Carolina brigade finally gets forward and deployed into its attack formation. The famed 'Rebel Yell' is sure to sound out soon signifying a terrifying bayonet charge!
As the Rebs' right flank advances the 1st US Regulars rush to line the Turnpike fencing and steady themselves to deliver a telling first volley.
Meanwhile in the centre the Rebs renew the attack against the thinly held line comprising the Sharpshooters and the 79th. Reinforcements are urgently needed but none are moving forward yet!
Finally the Georgian Brigade is getting forward after some hesitation and confusion of orders.
A deadly firefight erupts along the Union's left front as the Rebs' seek to advance and throw the defenders out of their position. The 2nd US Regulars are hurrying into action along their comrades' right flank.
The Garibaldi Guard are caught by an unexpected Reb charge as they move forward into position. A fierce but indecisive melee begins with neither side able to deliver a telling blow but neither giving ground either.
The Union left in buckling under heavy Reb fire but has not broken. Could the Rebs' attack be begining to stall?
At last the Union centre receives reinforcement at just the right moment. It seems the Rebs' attack in the centre has also stalled?
Indeed all along the front the Rebs' attack has first been halted and then thrown back by staunch Union defenders.
It's all up for PJ's boys in Turn 8 as broken brigades stream away towards the safety of their encampment. US Bykleigh's men are too worn to offer much in the way of pursuit as the expected reinforcements have failed to march to the sound of the guns!
The Rebs' camp is safe for the moment. PJ must needs take stock of his position and urgently beseach Richmond for much needed reinforcements before he can take the fight to the Union once more.
As ever Black Powder, with some additions from the Glory Hallelujah supplement, provided us with a challenging game. Fortunes ebbed and flowed, orders were lost in confusion, and men stubbornly held on or unexpectedly failed. All you could want from a game really! What will the next development be in the intense struggle to control The Valley...?

Tuesday 27 February 2024

Amidst the carnage of battle

While I was working away steadily on the 31st Huntingdonshire Infantry regiment I was also splashing paint intermittently on some spare Roosian casualty figures with a view to composing another vignette, a fripary if you will, to serve as an objective marker or a table filler in our games. While the configuration of figures was pleasing to my eye I couldn't help but think it just lacked something. This thought was nagging away at me when I had a revelation almost; what I needed was a Roosian Orthodox Priest providing spiritual succour amidst the carnage of battle! I knew Foundry had one such figure, but in a set of SYW Cossacks which I had no obvious use for, so I began searching the web for a suitable single figure. I found one on The Assault Group {TAG} site which would do the job nicely - in fact I found two, but the second was in a Muscovite Command set and again I had no use for the other two figures. I did cheekily ask if he would sell me the single figure clutching an icon from the set, sadly without success. {You have to say some folk seem to find it hard to think outside the box. A little leeway on his part would have bought praise here, instead it's a gentle reproof.} Oh well... Anyway, here is the end product for your interest, even comment if you're so minded ~

Snapped by that fellow Fenton perchance? No? Oh well, here are some  captured in Glorious GHQ Colour as our Hollywood PR folk might say instead ~

As usual, the infantry figures from Great War Miniatures, the Orthodox priest from TAG, and the base from Warbases. I think the composition has worked out well, so I have to thank Matt for his useful insight there. {It doesn't compare with his prize winning vignette at last year's The Other Partizan, but his old man knows when to take advice from a greater talent!} If you've not seen it, here it is as a closing bonus~

Next up will be a battery of Roosian 12lb guns, their bases just need the addition of static grass and Tufts and they will be completed. Watch this space, as the saying goes...


Sunday 25 February 2024

The 31st Huntingdonshire Infantry regiment

The latest unit to progress across the painting desk and go under the brush are the 31st Huntingdonshire Infantry regiment. They are ready to muster into GHQ and complete the Second Brigade of my First Division in the British force ~

The figures are mostly by Great War Miniatures but this time also include three Warlord Games figures. The latter were part of a parcel I received from my friend Colin {of Carryings On Up The Dale} and further illustrate the point about our hobby's wonderful comradeship I was making in the previous blog post. The flags as usual are from North Star and the bases from Warbases as ever ~

Now that the 31st are finished the figures currently replacing them under the brush are a battery of Roosian 12lb guns and crew. They are Warlord Games figures and from that same parcel gifted me by Colin last year when the project first got underway. At present all the basic colours are blocked on on the first four gunners and the base bronze I use for cannon barrels is on both guns. I've also been working on a small vignette for the Roosians, but more of that in due course...

Thursday 22 February 2024

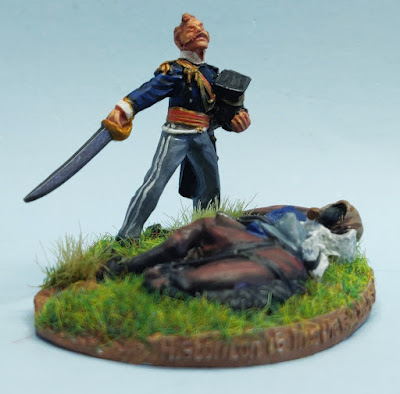
Flashman at 'The Charge'?

I know that I have mentioned this before, but some things about our wonderful hobby deserve frequent repetition in my opinion. One such is the kindness of not just friends but of members of the general body of hobby chums whom we may only know through the Internet or through occasional encounters at shows. So, a while back last year I received an unexpected parcel through the post. On examination I saw it was from Matt Crump {of Wargames in the Dungeon and Penrith fame}. I wasn't expecting it so opened it with more than my usual level of excitement. And what a welcome surprise it turned out to be: the Historicon freebie figure "Into the Valley of Death". Perfect as an objective marker or table dressing for my Crimean War project. I've had this on the go since the turn of the year, putting colour on as and when it was appropriate to those I was using elsewhere. In my mind I see him as that fictional arch cad and noted coward, the much decorated Victorian antihero Harry Paget Flashman ~

I believe it was a Warlord Games piece, if so it's a decent effort compared to some of their figures of late. So, I give you Flashman, unhorsed at The Charge and no doubt suffering from his usual pure funk! Meanwhile the 31st Huntingdonshire Infantry regiment are progressing steadily; two bases completed and the third well underway. More on these when they are finished next week hopefully.

Monday 19 February 2024

A Royal Artillery 9lb Battery

The most recent figures to have endured their time under the brush are two 9lb guns and crew for the Royal Artillery for my Crimean War project. They are all from Great War Miniatures, via North Star of course. I added one figure I'd saved from the British High Command pack, an officer with telescope, which I felt would help bring the battery to life. You can judge for yourself of course ~

I'm working on another British infantry regiment now, the 31st Huntingdonshire regiment, one base of which is already completed. This should complete the planned second Brigade for the First Division. Remaining in the infamous Lead Pimple amongst others are a regiment of Highlanders and a second battalion for the 1st, the Royal Scots. These will complete my truncated Highland Brigade. I had intended to add the Highland Light Infantry but have had a change of heart, mostly because I ordered the wrong flags sheet, but also because it seems they wore the earlier bell topped shako not the Albert one the figures have. Those figures will need to be redesignated in due course...

Friday 16 February 2024

The Valley Campaign...

...opened for its second year when Phil and I sat down here in GHQ for our weekly game. We both enjoyed the series of linked ACW games last year and agreed to try a second year and follow the unfolding tale of rivalry between Union Brigadier General Useless S Bykleigh and his nemesis Confederate Major General P.J. Robinson! The opening battle is an encounter between the two forces feeling their way to cross an engorged stream. As the Union fared badly in last year's conflicts they start the game with one Brigade in the rear, not able to enter the game until Turn 6, the halfway point in our 12 Turn game. On the front foot the Rebs start 12" in from their table edge. As usual now an annotated photo montage to carry you down into the unfolding action in The Valley...

On the Rebs' left a large Brigade of North Carolina infantry led by Jubal E Bykleigh, a turncoat if ever there was one!
In their centre two small brigades from Virginia and South Carolina.
On the Rebs' right two more small brigades from Louisiana and Georgia lead by another turncoat, Jonah Jeremiah Bykleigh!
On the Union's left flank a brigade from Wisconsin supported by two large regiments of Regulars.
In the Union's centre massed batteries of rifled artillery and a small Union Brigade from New York screened by the 1st US Sharpshooters.
Both sides advance on the stream in an attempt to cross over to the other side and blunt their opponent's movement. As you see, both fell short in the centre and a prolonged firefight breaks out.
On the Rebs' right the Louisiana brigade reaches the bridge and blocks off the Union left flank. Another prolonged firefight erupts here!
The Virginia brigade takes post behind the fence line and, you guessed it, another firefight begins with the New Yorkers!
The Union advance is halted all along it's front as both sides take losses in the ensuing turns of firing. The North Carolina brigade is ominously advancing on the Union's right-hand brigade. Still no sign of those much needed reserves.
The US Sharpshooters exploit a gap in the Rebs' centre and push across the stream. They are halted by enemy fire but hold their ground tenaciously.
Disorder prevents them being supported and they are exposed to withering fire from the Rebs! Unsurprisingly as losses mount they are Whipped and flee to the rear!
Reb artillery comes into action firing on the New Yorkers in support of the North Carolina brigade on their left.
Over on the Union left the firefight across the bridge is indecisive, both sides rallying casualties only to take more in the subsequent turns!
In the centre more Union troops have got across the stream but are halted by Rebel fire! Disorder prevents the bulge being exploited and PJ's boys hold on!
Finally, in Turn 8, the first of the Union's reserve brigade of New York troops finally arrives on the battlefield.
More New Yorkers are moving to the Union's right flank now hoping to turn the Rebs' left decisively...
The Union is pressing home it's attack on the Rebs' left as more troops cross the stream. The North Carolina boys are being pushed back slowly...
...when disaster, aka a Blunder, sees the Union's leading unit fall back two moves! The Tarheels have a breathing space!
Fighting continues to ebb and flow in the centre but neither side can deliver the telling blow!
A setback on the Union's left sees the regiment at the bridge finally beaten in the firefight as they flee along with the Brigade commander!
With their right holding the Rebs are pushing forward again in the centre. Unnerved by the Rebel Yell the New Yorkers' closing fire fails to halt the charging enemy!
They do enough though in the ensuing melee to hold their ground. The line may buckle but it does not break!
Darkness falls across the battlefield ( Turn 12 of course). Neither side has managed a victory in this first encounter of the year. Both armies fall back exhausted to plan their next move in the ongoing struggle to dominate The Valley.
Once again Black Powder delivered the uncertain ebb and flow of battle. As usual the figures are all Dixon Miniatures from my collection, the buildings scratch built or kitbashed, trees, stream and fences from The Last Valley.